Edit Evernote ENML Applescript

This Applescript just sends the currently selected note to the Evernote ENML Editor. Assign it to a hotkey using your favorite hotkey app and it’s a nice little time saver.


tell application "System Events"
set app_name to name of the first process whose frontmost is true
end tell

if (app_name is "Evernote") then
tell application "Evernote"
set noteList to selection
if (count of noteList) = 1 then
set noteGUID to my get_evernote_note_id((item 1 of noteList)'s note link)
set editURL to "http://enml-editor.ping13.net/note?n=" & noteGUID
end if
end tell
open location editURL

else
tell application "Evernote" to activate
end if

on get_evernote_note_id(this_text)
set AppleScript's text item delimiters to "/"
set the item_list to every text item of this_text
set AppleScript's text item delimiters to ""
return item 8 of item_list
end get_evernote_note_id

iDoneThis Applescript

I’ve been using iDoneThis for a few months now. It’s a simple service that emails you daily and asks “What’d you get done today”. It then keeps track of them all on their website in a calendar. They also mine your data for you to generate graphs and a word cloud. You can also enable daily emails reminding you of what you got one 1 week/1 month/1 year ago. Anyway,the problem with the daily email is that by the time I get the email I forget some things I’ve done. You can add items as you do them by sending an email to today@idonethis.com, but launching mail manually and creating a message is tedious. Thus the simple Applescript below. I have this assigned to a hotkey, but you could also save it as an application (and keep it in your dock).


set doneThis to text returned of ¬
(display dialog ¬
"What'd you do? " with title ¬
"iDoneThis" default answer ¬
"" buttons {"I Done It!", "Cancel"} ¬
default button 1)

if doneThis is not "" then
tell application "Mail"
set MyEmail to make new outgoing message
tell MyEmail
set content to doneThis
set subject to "A new thing I did today"
set sender to "YOUREMAIL@ADDRESS.COM"
make new to recipient at end of to recipients with properties {address:"today@idonethis.com"}
send
end tell
end tell
end if

Update 5/1/12
iDoneThis emailed and asked that I make this in to an application. I’ve made a simple application that’s made to live in your dock. You can quit it if you’d like, or leave it running. Each time you click the icon in the dock/switch to the application it will ask you what you’ve done, you can enter it in and press return or click “I Done It!”, it will then send off the email in the background. If your iDoneThis account isn’t setup using your default Mail email address you can change the email From address by launching/activating the iDoneThis application, then press “Cancel” on the dialog that pops up, then go to the iDoneThis menu select Preferences.

Update 5/23/12
Thanks to James Wang who made a few changes in order to support Teams! I’ve included these changes in the source and application linked below.

Download iDoneThis v1.5

Download Source (Cocoa/Applescript)

OS X Mail – Organization Technique

Ok, I have to start by saying that if you don’t have at least Mac OS X Lion (10.7) you are out of luck on this one.

With that out of way I’ll show you how I’ve been organizing my mail. Note that I just started this week, so it’s still a work in progress.

First let me show you my inbox:

My inbox

So close to inbox zero I can taste it!

To get the all the flags to show up, instead of just “Flagged” you need to first flag a few items with different colors in your inbox. Now, you’ll have the reveal arrow next to “Flagged”. Once you have that you can rename them at your leisure by double clicking on the name in the sidebar.

Ok after you have the flags you want to use set up, you will probably want to have an inbox that doesn’t show flagged items. I’ve done this using smart mailboxes.

There is no way to create a smart mailbox (below) by itself with a rule matching “not flagged”, so you have to create two smart mailboxes:
1) Create a Smart Mailbox named “Flagged Messages”. It should have one rule: Mail is flagged
2) Create a second Smart Mailbox named “******** Real Inbox ********”: It should have two rules: Mailbox is NOT “Flagged Messages”, Mailbox IS Inbox. Make sure to select “all” at the top where it says “Contains message that match ALL of the following conditions”.

My Real Inbox Smart Mailbox Settings

Now I only look at my smart mailbox “******** Real Inbox ********”. When I flag an item in here it disappears from my inbox and will show up in the one of the “Flagged” sections shown at the top. A caveat here is that for some reason the smart mailbox doesn’t update until you click another mailbox, then go back to the “Real Inbox”. I believe this could be a feature (just in case you accidentally use the wrong flag, you can change it before it disappears from the mailbox).

The last step for me (so far), was to set up rules for automatically processing mail as it came in. An example rule I use is “Notes to self”. I do this all the time and is probably a habit I won’t break soon. It gets my attention and is easy to do. This rule is simple: From and To are me, make sure you select “If all of the following conditions are met”.
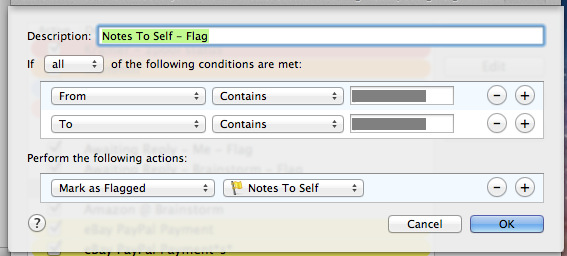
Make sure to select All instead of Any!

One other rule I use often is my “Awaiting Reply” rules. The way I use these is whenever I send an email that I know I want a reply to, I BCC myself. This rule finds messages BCC’d to myself and automatically flags them. This rule says if “To” does NOT contain my email address, and “From” does contain my email address, then flag it. This works because rules are only applied to incoming messages, so it won’t flag messages in your sent folder, only things that are BCC’d to yourself.
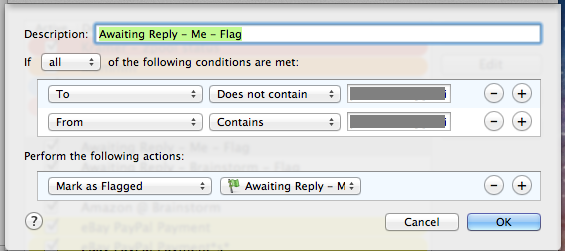
Again, make sure to select All instead of Any!

Ok, I hope someone finds this helpful. If you any have questions or suggestions feel free to comment.

UPDATE (9/25/12, 6 months in): In OS X 10.8 if you go to Mail’s Preferences-> General, you can set it to use the “Real Inbox” for the “Dock unread count” and for “New message notifications”.

Also, I definitely recommend setting up a time each day (or every few days, once a week, etc) to make sure you go through your flagged messages. This ensures you keep up on everything and keeps the flagged messages mailboxes manageable. Set a reminder on your calendar, or use Reminders, but do something to make sure you go though them. This system works pretty well once you get it down. It keeps mail organized and ensures you follow-up when needed.

Mute Optical Output On OS X

This is truely frustrating. Not being able to control the system volume when using optical output I could definitely deal with, IF I could at least mute it. After some Googling I realized this just wasn’t going to happen – at least not without some creative thinking. This solution is not exactly elegant, but, it does work.

I had recently installed Plex which installed SoundFlower. SoundFlower allows you to send all system output to an application for processing (normally, to record or send audio to another computer/device). I don’t use it at all though, so as I expected activating this effectively muted my audio. If you do use it, well, you may need to figure out another way to do this.

So the first step here is if you don’t have SoundFlower installed, go grab it and install it. Now, I like everything to be controled via the keyboard, but if you don’t care about this then don’t worry about the rest of this post. You can change the audio output via the sound menu in your menubar by holding down option when clicking on it.

If you want to control this with a key command, then here goes.

First download this: SwitchAudioSource. I put it in /usr/local/bin, but thats up to you.

Next I wrote a simple Applescript to execute the command. Applescript editor is located at “/Utilities/Applescript Editor”.

If you plan to use Growl notifications, just run this Applescript first, you only need to run it once to register the notifications we’ll be using.

tell application “GrowlHelperApp”
set appName to “System Preferences”
set notificationName to “Sound Muted”
set notifs to {“Sound Muted”, “Sound Un-Muted”}
register as application appName all notifications notifs default notifications notifs
end tell

Next up, save the following script somewhere:

set curOut to (do shell script “/usr/local/bin/SwitchAudioSource -c”)
if (curOut = “Built-in Output”) then
do shell script “/usr/local/bin/SwitchAudioSource -s ‘Soundflower (2ch)'”
set notificationName to “Sound Muted”
set growlString to “Muted”
my pause_itunes()
else
do shell script “/usr/local/bin/SwitchAudioSource -s ‘Built-in Output'”
set notificationName to “Sound Un-Muted”
set growlString to “Un-Muted”
my play_itunes()
end if

tell application “GrowlHelperApp”
set appName to “System Preferences”
notify with name notificationName application name appName title notificationName description growlString
end tell

on pause_itunes()
try
tell application “Finder” to get (every process whose name is “iTunes”)
if result is not {} then — only update when iTunes running
tell application “iTunes”
if player state is playing then
pause
end if
end tell
end if
end try
end pause_itunes

on play_itunes()
try
tell application “Finder” to get (every process whose name is “iTunes”)
if result is not {} then — only update when iTunes running
tell application “iTunes”
if player state is paused then
play
end if
end tell
end if
end try
end play_itunes

As you can see I added a little more to this. The basic stuff is just the do shell script calls to SwitchAudioSource. I added Growl notifications to tell me when this runs, as well as checking with and pausing/playing iTunes when I mute/unmute.

I run this script with a keyboard command thanks to the excellent application Proxi from Griffin. You could even just save it as an application and keep it in your dock if that suits you.

Disclaimer: There is almost certainly a more elegant way to do this, namely it can almost certainly all be accomplished via just the command line, but getting it working in Applescript was the fastest way for me to do it. This runs in less than a second under heavy load on my system, so, it’s a not a problem for me.

iTunes Sleep Timer – With Fade Out Applescript

I like to listen to music or an audiobook as I fall asleep, but don’t want it to continue playing all night, so I put together this little script to implement an iTunes “Sleep Timer”. It also fades the volume down which makes it very difficult to notice and seems to help falling asleep (could be all in my head though).

How it works: When run it asks how many minutes you want to wait before “going to sleep”. It then waits until “fade_for_minutes” minutes (default is 10) less than the time you specified and starts to fade out iTunes. It pauses after the fade completes, then restores the volume to the setting it was started with.

Example:
Run at: 10:00pm
Sleep time: 60 minutes
fade_for_minutes: 10 minutes
initial volume: 100 (iTunes volume ranges from 0 to 100)

At 10:50 fade_sound will start running. It will decrease the iTunes volume by 1 every 6 seconds ((fade_for_minutes*60)/initialVolume).
At 11:00 it will pause the currently playing track, reset the volume to 100, and quit itself.

You can either try to copy/paste the script below in to Applescript Editor, then save as an application and be sure to check off “Stay Open”, or you can download the Application.


property lastSleepLength : 5
property fade_for_minutes : 10

global endTime, initialVolume

on idle
-- Wait until fade_for_minutes before the end time
-- Then call fade_sound which will fade the sound, pause itunes, and reset the volume
set curTime to current date
if ((curTime + (fade_for_minutes * 60)) ≥ endTime) then
my fade_sound()
quit me
end if
return 1
end idle

on run
try
set endTime to (current date) + getSleepLength()
tell application "iTunes" to set initialVolume to sound volume

on error number -128
-- user canceled
quit me
end try
end run

on fade_sound()
set timeBetweenDecreases to ((fade_for_minutes * 60) / initialVolume)
repeat with i from 0 to initialVolume
delay timeBetweenDecreases
tell application "iTunes" to set the sound volume to (sound volume) - 1
end repeat
my iTunesReset()
end fade_sound

-- Pause iTunes and reset volume
on iTunesReset()
tell application "Finder"
if process "iTunes" exists then
tell application "iTunes"
if player state is playing then
pause
end if
set the sound volume to initialVolume
end tell
end if
end tell
end iTunesReset

-- gets the amount of minutes till we go to sleep
on getSleepLength()
repeat
set dialogResult to display dialog "How many minutes till we go to Sleep?" default answer lastSleepLength
try
if text returned of the dialogResult is not "" then
set sleepLength to text returned of dialogResult as number
exit repeat
end if
beep
end try
end repeat

set lastSleepLength to sleepLength

return (sleepLength * 60) -- Return in seconds
end getSleepLength

SizeUp – Resize/Position Windows Using The Keyboard

I’ve posted a few scripts I’ve written to solve some window placement issues on OS X (especially when removing an external display). I actually haven’t been using my scripts as much recently since I found this application. Put simply: it allows you to move and position windows using the keyboard. Check out the web site for full details including a video of it in action. At $13 for a license, it’s a no brainer, give it a try: SizeUp

iTunes Won’t Play Songs OS X Fix

I was just playing around with the Boxee Beta and it hung. I force quit it, and subsequently tried to play a song in iTunes. It wouldn’t play. I tried playing a new song and took note: the time didn’t move from 0:00, the song information was scrolling at the top, and there was a speaker icon next to the song. Yes, the volume was up. Quitting iTunes and reopening it didn’t fix it (tried a few times).

So, I opened up Activity Monitor and did some quick searches to see if I could find something related to iTunes, Boxee, and Sound. Anyway, there is a process called coreaudiod – the core audio daemon. Force-quit that (requires admin privileges) and boom! iTunes works again.

Fix Arrow Keys in VI on Solaris

This was taken from http://www.unix.com/unix-dummies-questions-answers/59467-sunos-5-10-vi-arrow-keys-not-working-post302181425.html and I didn’t want to lose it.

Enter the following into $HOME/.exrc file. First entry is to make DELETE work as Backspace and Remaining/Subsequent 4 entries are traversal into file using Arrow-Key. All 5 entries are applicable for “Editing” mode of vi editor.

DO NOT COPY/PASTE THIS:
:map! ^? ^H
:map! ^[OA ^[ka
:map! ^[OB ^[ja
:map! ^[OC ^[la
:map! ^[OD ^[ha

To type all CONTROL (the ^ and ^[ characters) characters:
^? = CTRL-V + DELETE
^H = CTRL-V + BACKSPACE
^[OA = CTRL-V + UP-Arrow
^[ka = CTRL-V + ESCAPE + k + a
^[OB = CTRL-V + Down-Arrow
^[ja = CTRL-V + ESCAPE + j + a
^[OC = CTRL-V + Right-Arrow
^[la = CTRL-V + ESCAPE + l + a
^[OD = CTRL-V + Left-Arrow
^[ha = CTRL-V + ESCAPE + h + a

How To Add Time In Excel Or Numbers

This one had me going for a while the other day. I had a cell with a time in it, and just wanted to add 15 minutes to it and place it in the cell next to it. Anyway, the way to do this is to add (or subtract) #Minutes/1440.

For example, if cell A1 has the time 6:15 in it, and you want to add 15 minutes to it for cell A2 simply set it =A1+(15/1440).

The reason for this is that Excel (and Numbers, and.. most likely any other spreadsheet software out there) keeps track of dates, not time – so if you have a date of 6/19/2009, and in the next cell you want 6/20/2009 – you add 1. Well, there are 1440 minutes in a day, so you simply have to add a fraction of a day equal to the amount of time you want to add. So 15/1440 = 0.0104166667 days.

Restore Previous Display Window Positions AppleScript

This AppleScript is sort of a hack to restore window positions after removing/adding an external display, similar my other script to move all windows to the main screen. You should run it before you disconnect the display, then again when you reconnect it. It’s customized for my environment right now, so you’ll need to look through the code a bit to customize it. I have this saved as an application in my Applications folder for quick launching with Spotlight.

property numFFWindows : 0
property FFPos : {}
property FFSize : {}
property iTunesPos : {}
property iTunesSize : {}
property iCalPos : 0
property iCalSize : 0
property AdiumContactsPos : 0
property AdiumContactsSize : 0
property AdiumIMSize : 0
property AdiumIMPos : 0
property OFPos : 0
property OFSize : 0

display dialog "Set Window Position or Save Window Position?" buttons {"Restore", "Save"} default button "Restore"
set theResult to result

tell application "System Events"
    if (button returned of theResult is "Restore") then
        -- Restore Settings
        if (numFFWindows > 0) then
            tell process "Firefox"
                repeat with i from 1 to numFFWindows
                    set position of window i to (item i of FFPos)
                    set size of window i to (item i of FFSize)
                end repeat
            end tell
        end if
        if (iTunesPos is not {0, 0}) then
            tell process "iTunes"
                set position of window 1 to iTunesPos
                set size of window 1 to iTunesSize
            end tell
        end if
        if (iCalPos is not {0, 0}) then
            tell process "iCal"
                set position of window 1 to iCalPos
                set size of window 1 to iCalSize
            end tell
        end if
        if (OFPos is not {0, 0}) then
            tell process "OmniFocus"
                set position of window 1 to OFPos
                set size of window 1 to OFSize
            end tell
        end if
        if (AdiumContactsPos is not {0, 0}) then
            tell process "Adium"
                set position of window "Contacts" to AdiumContactsPos
                set size of window "Contacts" to AdiumContactsSize
                repeat with i from 1 to (count windows)
                    if ((window i) is not (window "Contacts")) then
                        set position of window i to AdiumIMPos
                        set size of window i to AdiumIMSize
                    end if
                end repeat

            end tell
        end if

    else
        -- Save Settings
        tell process "Firefox"
            set numFFWindows to count windows
            set FFPos to {}
            set FFSize to {}
            repeat with i from 1 to numFFWindows
                set end of FFPos to (position of window i)
                set end of FFSize to (size of window i)
            end repeat
        end tell
        tell process "iTunes"
            set iTunesPos to position of window 1
            set iTunesSize to size of window 1
        end tell
        tell process "iCal"
            set iCalPos to position of window 1
            set iCalSize to size of window 1
        end tell
        tell process "OmniFocus"
            set OFPos to position of window 1
            set OFSize to size of window 1
        end tell
        tell process "Adium"
            set AdiumContactsPos to position of window "Contacts"
            set AdiumContactsSize to size of window "Contacts"
            set AdiumIMPos to {}
            set AdiumIMSize to {}
            repeat with i from 1 to (count windows)
                if ((window i) is not (window "Contacts")) then
                    set AdiumIMPos to (position of window i)
                    set AdiumIMSize to (size of window i)
                end if
            end repeat
        end tell
    end if
end tell