Ok, I have to start by saying that if you don’t have at least Mac OS X Lion (10.7) you are out of luck on this one.
With that out of way I’ll show you how I’ve been organizing my mail. Note that I just started this week, so it’s still a work in progress.
First let me show you my inbox:
To get the all the flags to show up, instead of just “Flagged” you need to first flag a few items with different colors in your inbox. Now, you’ll have the reveal arrow next to “Flagged”. Once you have that you can rename them at your leisure by double clicking on the name in the sidebar.
Ok after you have the flags you want to use set up, you will probably want to have an inbox that doesn’t show flagged items. I’ve done this using smart mailboxes.
There is no way to create a smart mailbox (below) by itself with a rule matching “not flagged”, so you have to create two smart mailboxes:
1) Create a Smart Mailbox named “Flagged Messages”. It should have one rule: Mail is flagged
2) Create a second Smart Mailbox named “******** Real Inbox ********”: It should have two rules: Mailbox is NOT “Flagged Messages”, Mailbox IS Inbox. Make sure to select “all” at the top where it says “Contains message that match ALL of the following conditions”.
Now I only look at my smart mailbox “******** Real Inbox ********”. When I flag an item in here it disappears from my inbox and will show up in the one of the “Flagged” sections shown at the top. A caveat here is that for some reason the smart mailbox doesn’t update until you click another mailbox, then go back to the “Real Inbox”. I believe this could be a feature (just in case you accidentally use the wrong flag, you can change it before it disappears from the mailbox).
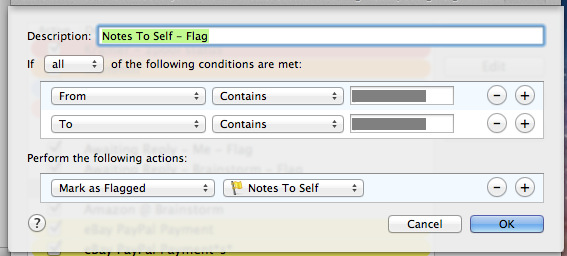
The last step for me (so far), was to set up rules for automatically processing mail as it came in. An example rule I use is “Notes to self”. I do this all the time and is probably a habit I won’t break soon. It gets my attention and is easy to do. This rule is simple: From and To are me, make sure you select “If all of the following conditions are met”.
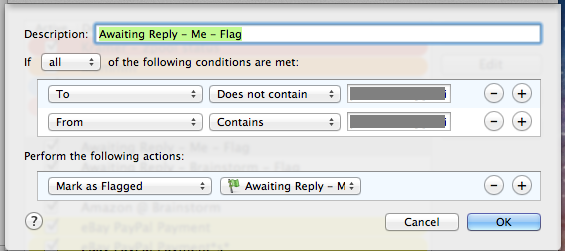
One other rule I use often is my “Awaiting Reply” rules. The way I use these is whenever I send an email that I know I want a reply to, I BCC myself. This rule finds messages BCC’d to myself and automatically flags them. This rule says if “To” does NOT contain my email address, and “From” does contain my email address, then flag it. This works because rules are only applied to incoming messages, so it won’t flag messages in your sent folder, only things that are BCC’d to yourself.
Ok, I hope someone finds this helpful. If you any have questions or suggestions feel free to comment.
UPDATE (9/25/12, 6 months in): In OS X 10.8 if you go to Mail’s Preferences-> General, you can set it to use the “Real Inbox” for the “Dock unread count” and for “New message notifications”.
Also, I definitely recommend setting up a time each day (or every few days, once a week, etc) to make sure you go through your flagged messages. This ensures you keep up on everything and keeps the flagged messages mailboxes manageable. Set a reminder on your calendar, or use Reminders, but do something to make sure you go though them. This system works pretty well once you get it down. It keeps mail organized and ensures you follow-up when needed.


Okay, this is probably my new favourite blog! =) This is quite helpful, thanks for sharing!